How to Decorate Sugar Cookies

Dive into the delightful world of ‘how to decorate sugar cookies,’ where every cookie is a fresh canvas awaiting your artistic touch. With a rolling pin and a piping bag as my tools of the trade, I’m here to guide you through the magical transformation from simple dough to exquisite art.
When you set out to create sugar cookies, you embark on a role far greater than just baking; you become a confectionery artist, a maestro of sweet creations. My own journey into the realm of sugar cookie decoration began years ago, captivated by the infinite possibilities contained within each tender cookie. It’s this fervent enthusiasm I aim to pass on to you, with each sugary masterpiece we create together.
Gathering Your Supplies
Before we dive in, let’s talk tools. At the core, you’ll need a sturdy rolling pin, a set of cookie cutters, a baking sheet, and parchment paper. For those ready to up their game, a turntable and specialized piping tips can elevate your designs.
Step-By-Step Guide to Cookie Decoration

The Best Sugar Cookie Recipe for Decorating
Mastering ‘how to decorate sugar cookies’ begins with crafting the perfect base. Our canvas? The sugar cookie. Let’s ensure we have everything to start with:
- 3 cups of all-purpose flour
- 1 teaspoon of baking powder
- A pinch of salt
- 1 cup of unsalted butter
- 1 cup of granulated sugar
- 1 egg
- 1 tablespoon of vanilla extract
Learn ‘how to decorate sugar cookies’ starting with the basics: Combine the dry ingredients while creaming butter and sugar separately. Mix in the egg and vanilla, then blend with the dry ingredients until the dough is firm yet pliable.
Rolling Out Your Dough
Consistency is key. Aim for a quarter-inch thickness for a cookie that’s sturdy yet tender. Dust your surface with flour, and if the dough sticks, pop it back in the fridge for a bit.
Cutting Out Shapes
Choose your cutters wisely; they are the blueprint of your final product. Press firmly and use a gentle wiggle to ensure clean edges. If the dough warms up and becomes sticky, a quick chill can make it cooperative again.
Baking to Perfection
I’ve found 375°F (190°C) for about 8-10 minutes does the trick, but keep an eye on them. You want a golden edge – the sign they’re ready to come out and cool.
Mixing Your Icing
Royal icing is the way to go. Mix powdered sugar with a bit of meringue powder and water until it’s smooth. Then, divide and conquer with colors.
Outlining and Flooding
With a steady hand, outline the borders of your cookie. Once set, thin out your icing slightly to fill in – this is called flooding. It creates a smooth, even base.
Adding Details and Texture
Now, unleash your inner Michelangelo. Piping on details requires a firmer icing and a variety of tips. Practice makes perfect, so don’t be discouraged if your first fleur-de-lis looks more like a blob.
How to Start the Base Layer
Themed Decoration Ideas
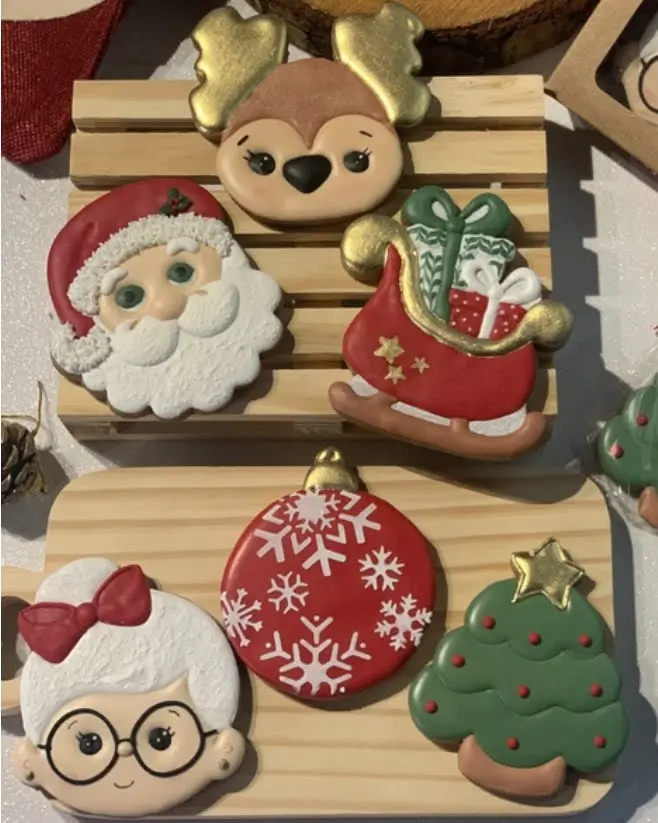
Whether it’s Christmas trees or Halloween ghosts, themed cookies are a hit. Use colors and designs relevant to the occasion to bring your cookies to festive life.
Letting Your Creativity Shine
This is where you make your mark. Add your personal flair. No one else can make cookies quite like you do, so embrace that uniqueness.
How To Transfer the Design
Using a Pico Projector for Cookie Decoration with Royal Icing
Learning how to decorate sugar cookies with detailed and precise designs can often be daunting. However, the advent of the pico projector, a small and easily transportable projector, has revolutionized this art. This device proves to be an indispensable tool for those looking to achieve high levels of precision in their sugar cookie decoration. This guide will explain how to utilize a pico projector to effortlessly transfer intricate designs onto sugar cookies and embellish them beautifully with royal icing.
Understanding the Role of a Pico Projector
A pico projector is a small, handheld device that can project images onto a surface. In cookie decorating, it’s used to project a design directly onto a cookie, which can then be traced or used as a guideline for applying royal icing.
Setting Up the Pico Projector
- Selecting the Design: Choose a design that you want to transfer onto your cookie. This can be anything from intricate patterns to character images.
- Preparation: Position the pico projector so it’s aimed directly at the cookie. The surface should be flat and stable to ensure the image isn’t distorted.
- Adjusting the Focus: Fine-tune the focus of the projector to ensure the image is sharp and clear on the cookie surface.
Transferring the Design
- Tracing the Design: Lightly mark the design with an edible pen or gently imprint the outline with a scribe tool. This step requires a steady hand and patience.
- Flexibility in Design: The pico projector allows for easy resizing and repositioning of the design, making it versatile for different cookie sizes and shapes.
Decorating with Royal Icing
- Outline and Flood: Use a piping bag with a fine tip to outline the design. Then, flood the interior areas with a thinner consistency of royal icing.
- Layering: For more complex designs, allow each layer of icing to dry before adding new details. This prevents colors from bleeding into each other.
- Precision and Detail: The projected image serves as an exact guide, allowing for intricate details that might be difficult to achieve freehand.
Advantages of Using a Pico Projector
- Accuracy: It enables the decorator to replicate complex designs with high precision.
- Time-Efficient: Reduces the time spent on sketching or freehand drawing complex patterns.
- Versatility: Suitable for various skill levels, from beginners to advanced decorators.
- Customization: Allows for easy customization of designs, making it ideal for personalized cookie projects.
Tips for Best Results
- Room Lighting: Work in a dimly lit room to ensure the projected image is visible and clear on the cookie.
- Steady Base: Ensure the cookie is on a non-slip surface to avoid movements during the decorating process.
- Practice: Experiment with different designs and icing consistencies to find what works best for you.
Review of the AAXA LED Pico Projector
The AAXA Technologies KP-101-01 AAXA LED Pico Micro Video Projector stands out for its blend of portability and performance, making it a popular choice among users. Here are its key features:
- Ultra Bright 25 Lumens: Despite its small size, this projector offers a brightness of 25 lumens, making it suitable for various lighting conditions.
- High Definition Resolution: With a native resolution of 720p (1280×720) and a maximum support of 1080p, it provides clear and vibrant visuals.
- Long-Lasting LED Technology: The projector uses Vibrant Color Technology with LEDs that have a lifespan of up to 15,000 hours, ensuring long-term usage.
- Portable with Rechargeable Battery: It features an 80-minute built-in rechargeable Lithium-ion battery, adding to its portability. The battery can be conveniently charged via a micro USB cable.
- Built-in Speakers: Comes equipped with its own speakers, making it a self-contained multimedia device.
- Versatile Connectivity: Offers mini-HDMI, 3.5mm Aux Audio Out, and Composite A/V connections. It also includes Micro SD and USB readers for direct media playback, accepting sizes up to 16GB.
- User-Friendly: Designed for personal media sharing, it features USB Plug ‘n Play for instant setup and is compatible with both Apple Mac and PC.
- Large Display Capability: Capable of projecting up to a 60-inch image in low-light conditions, making it suitable for small group presentations or personal entertainment.
This projector from AAXA Technologies is a compact, versatile, and easy-to-use device that offers good value for its features, particularly for those looking for a mobile mini projector for personal media sharing.
Troubleshooting Common Decorating Issues

When learning how to decorate sugar cookies, it’s important to remember that if the icing isn’t cooperating, simply adjust its thickness for better control. Also, if a cookie happens to break, consider it a perfect chance for a taste test.
- Cookies Spread Too Much: The culprit is often butter that’s too soft or an oven that’s too cool. Butter should be firm, not greasy, to hold its shape. Also, make sure your dough is thoroughly chilled, and double-check your oven temperature with a thermometer. If your baking soda is older than six months, it might be time to bid it farewell and get a new box.
- Cookies Don’t Spread Enough: This can happen if the dough is over-chilled or the oven is too hot, causing the outside to set before the cookie has a chance to spread. Let the dough sit at room temperature for a bit before baking. Also, don’t forget the importance of creaming your butter and sugar until it’s light and fluffy to introduce the right amount of air.
- Cookies Are Too Tough: Overworking the dough can develop the gluten in the flour too much, leading to cookies that could go toe-to-toe with a jawbreaker. Mix just until the ingredients are combined. And if you’re getting an arm workout while rolling out the dough, it’s too stiff – let it warm up slightly.
- Cookies Are Too Crumbly: Not enough moisture could be the issue here. It might be that there’s too much flour – be sure to spoon and level it when measuring, rather than scooping. Or perhaps there weren’t enough eggs to bind everything together. Each ingredient plays a role, so precise measuring is key.
- Burnt Bottoms: The dark side of cookies isn’t a delight; it’s a sign that your baking sheet might be too thin, or the oven rack is too low. Double up your baking sheets to insulate or line with parchment paper. And keep those racks centered unless the recipe states otherwise.
- Uneven Baking: If some cookies are pale while others are golden, your oven might have hot spots. Rotate your baking sheet halfway through the bake time to even things out. Consider investing in an oven thermometer to really see what’s happening in there.
Preserving and Storing Decorated Cookies
Once decorated, keep them in an airtight container to maintain freshness. If stacking, parchment paper between layers is your friend.
Conclusion
Uncover the secrets of ‘how to decorate sugar cookies’ and turn each batch into a canvas of delicious designs that will spread joy and smiles aplenty.
FAQs
- How long should I chill the dough?
At least 30 minutes, but longer is fine too. - What if my icing colors bleed?
Let each color set before adding adjacent colors. - Can I freeze decorated cookies?
Absolutely, just make sure they’re completely dry first. - Why is my icing not setting?
Humidity can affect it; try adding more powdered sugar. - How far in advance can I make my cookies?
A week is usually safe if stored correctly.
Resources
https://www.pinterest.com/Sweetopia/cookie-decorating-tutorials-tips/


