Halloween Cookie Decorating Kit: Ultimate Guide

1. Introduction to Halloween Cookie Decorating
Halloween is that bewitching time of the year when creativity blossoms, and what better way to channel this than through baking? Using a halloween cookie decorating kit isn’t just fun; it’s a perfect way to bond with family and friends over spooky designs and sweet treats. In this guide, I’ll walk you through everything from selecting the ideal halloween cookie decorating kit to showcasing your finished cookies.
Why Decorate Cookies for Halloween?
There’s something special about the combination of autumn’s chill in the air and the anticipation of trick-or-treaters that makes decorating cookies so enjoyable. It’s not just about the sweets—it’s about creating something memorable and unique. Whether you’re aiming for frightfully fun or ghoulishly glamorous, cookie decorating lets everyone, from kids to adults, express their artistic side.
What Makes a Good Cookie Decorating Kit?
A good Halloween cookie decorating kit should cater to both beginners and seasoned decorators. It should include a variety of cookie cutters, a range of icing colors, and perhaps some unique elements like edible glitter or themed sprinkles. Quality matters too; look for kits with sturdy tools and tasty cookie mix to ensure your creations are both beautiful and delicious.
2. Choosing Your Halloween Cookie Decorating Kit
Selecting the right halloween cookie decorating kit can transform your Halloween baking into a delightful and memorable activity. Here’s how to choose a kit that suits your needs, ensuring your spooky season is filled with fun and creativity.
Essential Components of a Cookie Decorating Kit
A comprehensive halloween cookie decorating kit should include several key components to facilitate both the ease of decorating and the quality of your finished treats. When browsing kits, consider these must-have items:
- Cookie Cutters: These are the foundation of your decorating adventure. Look for a variety of shapes pertinent to Halloween, such as pumpkins, ghosts, witches’ hats, and bats. The variety in shapes will not only give you more creative options but also make the decorating process much more enjoyable for participants of all ages.
- Icing Bags and Tips: Precision is crucial when adding intricate details to your cookies. A good kit should include multiple icing bags and a range of tips (like star, round, and leaf tips), enabling you to execute everything from simple outlines to complex multi-layered designs. These tools are essential for applying fine details that bring your spooky creations to life.
- Edible Decorations: To truly make your cookies stand out, look for kits that include a vibrant selection of edible decorations. Colored sugars, sprinkles, edible glitter, and fondant are fantastic for adding texture and flair to your designs. These elements can transform a plain cookie into a spectacular one with just a sprinkle or a roll.
- Recipes and Instructions: Especially for those new to cookie decorating, having a clear and easy-to-follow guide is invaluable. The best halloween cookie decorating kit will include recipes for the cookies and icing, along with detailed instructions for using the included tools. This is crucial for beginners and also serves as a helpful refresher for more experienced bakers.
Additional Tips for Choosing Your Kit
When comparing different halloween cookie decorating kits, keep these additional tips in mind to ensure you get the best possible experience:
- Check for Quality: Ensure the ingredients and tools in the kit are of high quality. Higher-quality ingredients will not only taste better but also provide a better aesthetic finish to your decorations.
- Ease of Use: Consider who will be using the kit. If it’s for children or beginners, look for kits that prioritize simplicity and safety (such as easy-squeeze icing bottles and plastic rather than metal cutters).
- Thematic Cohesion: Some kits are themed more specifically (like ‘Haunted House‘ or ‘Ghoulish Graveyard‘) which can add an extra layer of fun and immersion to your cookie decorating activity.
Top Kits Available on the Market
I’ve tried several kits over the years and a few stand out for their quality and creativity. When it comes to Halloween festivities, the right tools can elevate your decorating game, whether you’re carving pumpkins or crafting cookies. Below, I’ve reviewed three popular Halloween-themed products that can help you enhance your holiday celebrations.
1. Shuttle Art 40PCS Halloween Pumpkin Carving Kit
The Shuttle Art Pumpkin Carving Kit offers a comprehensive set of tools and accessories for both beginners and seasoned pumpkin carvers. Here’s a closer look:
Pros:
- Complete Set: Includes 22 stainless steel carving stencils, 15 electronic candles, and essential carving tools, making it ideal for family crafting.
- Safety First: The electronic candles are a safer alternative to traditional candles, especially important when kids are involved.
- Durability: Tools are made of high-quality stainless steel, promising longevity and resistance to rust.
- Versatility: With over 1000 stencil combinations, creativity is limitless. The tools are also suitable for various skill levels.
- Ease of Use: The kit is very beginner-friendly, with a user manual that offers design inspirations and step-by-step tutorials.
Cons:
- Age Limitation: Not suitable for children under 12 without supervision due to sharp tools.
- Manual Dependency: Some users might find themselves heavily reliant on the manual for creative ideas.


2. Large Halloween Cookie Cutter Set – 7 Piece (Keewah)
Keewah’s 7-piece set of large Halloween cookie cutters is a hit for baking enthusiasts looking to add a spooky touch to their culinary creations.
Pros:
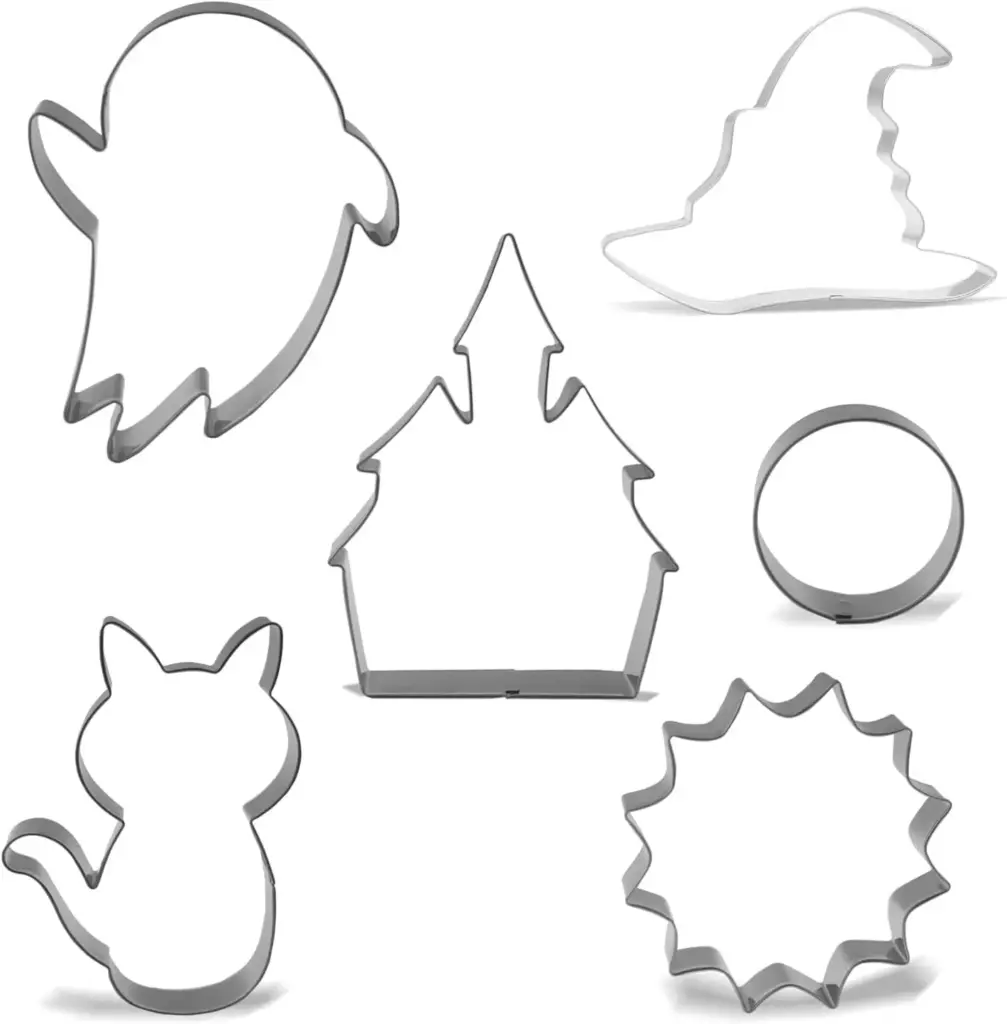
- Diverse Shapes: Includes popular Halloween figures like ghosts, scared cats, and witches’ hats, providing variety for party themes.
- High Quality: Made from sturdy stainless steel ensuring the cutters maintain their shape and resist wear.
- Dishwasher Safe: Easy cleanup as the cutters are dishwasher safe.
- Versatility: Beyond cookies, these cutters can be used for pancakes, cheeses, and even crafting, making them multipurpose.
- Value for Money: High ratings for affordability coupled with quality and usability.
Cons:
- Sharp Edges: Care should be taken during use as the edges are sharp and could be hazardous, especially for children.
- Storage: No storage box included which could make organizing them a bit challenging.
3. Large Halloween Cookie Cutter Set – 6 Piece (Keewah)
This 6-piece cookie cutter set from Keewah brings unique designs like castles and spider webs to your kitchen, perfect for a thematic Halloween bash.
Pros:
- Unique Designs: The inclusion of a castle and spider web broadens creative possibilities for themed parties.
- Sturdy Material: Constructed from durable stainless steel, these cutters are built to last through many baking seasons.
- Easy Maintenance: Dishwasher safe feature makes them easy to clean and maintain.
- Multi-Functional: Ideal for use with a variety of foods and craft materials, enhancing their utility beyond cookies.
- Affordable: Competitively priced, offering great value for a specialty baking tool.
Cons:
- Limited Edition: Fewer pieces than some competing sets, which may require additional purchases for more variety.
- Handling Care: Like the 7-piece set, the edges are sharp, which requires careful handling, especially when used by children.
DIY vs. Store-Bought Kits
While store-bought kits are convenient, creating your DIY kit can be immensely rewarding. You can select organic, gluten-free, or vegan ingredients to cater to dietary needs, and customize the cookie cutters and decorations to your taste. Plus, mixing and matching supplies from different sources allows for a personalized decorating experience that store-bought kits can’t match.
3. Preparing to Decorate Your Halloween Cookies
Before the creative fun begins, preparing your space with an organized and efficient setup is crucial. This preparation not only makes the decorating process smoother but also enhances the enjoyment of crafting your Halloween treats. Using a halloween cookie decorating kit effectively requires some initial steps to ensure everything goes as planned.
Setting Up Your Workspace
Creating an optimal decorating environment is a foundational step in the cookie decorating process. Here’s how to prepare:
- Clear and Clean Your Work Area:
- Space Requirements: Ensure your surface is clean and spacious enough to accommodate your cookies, decorating tools, and decorations. A clutter-free workspace allows for easier movement and less chance of accidents.
- Sanitation: Cleanliness is crucial not just for aesthetics but also for food safety. Wipe down your counters with a food-safe cleaner before starting.
- Organize Your Tools and Ingredients:
- Accessibility: Arrange all your tools and ingredients within reach to minimize disruptions during the decorating process. This means having your halloween cookie decorating kit contents spread out and sorted.
- Organization Tools: Use small bowls or containers to separate and organize different decorations and colors. Labeling these containers can also help in quickly identifying the contents, which is especially helpful if you’re working with a variety of icing colors and decorations.
- Prepare Your Cookies:
- Cooling: Ensure that your cookies are completely cooled before you begin decorating. Decorating warm cookies can lead to melted icing and smudged designs.
- Layout: Arrange your cookies on parchment-lined baking sheets or cooling racks within easy reach to streamline the decorating steps.
Organizing Your Decorating Tools
To maintain efficiency during the decorating process, keeping your tools well-organized is key:
- Separate Your Icing Bags and Tips:
- Preparation: Pre-fill several icing bags with different colors and fit them with various tips for different design effects. This setup allows you to switch easily between colors and designs, speeding up the decorating process.
- Storage: Consider using a stand or a holder to keep your icing bags upright and ready to use. This not only prevents spills but also keeps the tips from clogging.
- Keep a Damp Cloth Handy:
- Mistakes: Have a damp cloth or paper towel nearby to quickly clean off any mistakes or to wipe tips between uses. This is essential for keeping your work neat and professional-looking.
- Hygiene: Regularly wiping down your space and tools helps maintain a hygienic environment, especially when working with edible products.
- Use Plates or Trays for Sprinkles:
- Management: Sprinkles and small decorations can easily create a mess, so using plates or trays helps contain them. This method also makes it easier to apply sprinkles to your cookies without them rolling away.
- Reuse: Any unused sprinkles can be collected and reused, reducing waste and saving resources.
4. Step-by-Step Guide to Decorating Halloween Cookies
Once your workspace is set up using your halloween cookie decorating kit, it’s time to dive into the actual decorating process. Whether you’re a beginner or looking to refine your skills, this guide will walk you through basic and advanced techniques to create stunning, spooky cookies this Halloween.
Basic Decorating Techniques
Mastering basic decorating techniques is essential for producing beautifully decorated cookies. Here’s how to get started:
Piping
Piping is one of the fundamental skills in cookie decorating, used to create precise lines, intricate borders, and detailed designs. Here’s how to perfect your piping technique:
- Outline Your Designs First:
- Thickness of Icing: Start by using a slightly thicker icing to outline the shapes on your cookies. This acts as a barrier to contain the thinner icing that you’ll use for flooding.
- Tip Selection: Use a small round tip for more control over fine details and straight edges.
- Keep Consistent Pressure:
- Even Flow: Maintain a steady pressure on the icing bag to ensure a uniform flow of icing. This consistency is crucial for achieving professional-looking lines without breaks or bulges.
- Practice: If you’re new to piping, practice on parchment paper before moving on to your cookies to gain confidence.
Flooding
Flooding is used to fill in larger areas with a smooth layer of icing. This technique pairs well with piping to create a seamless and appealing finish:
- Thin Your Icing:
- Consistency: Once you’ve piped the outline, thin your icing slightly so it can easily flow and fill the outlined area. The ideal consistency is similar to honey; it should smoothly pour off a spoon but not be too runny.
- Use a Toothpick or Scribe Tool:
- Spreading Icing: After applying the thinned icing, gently use a toothpick or a scribe tool to guide the icing to the edges of your outline, filling any gaps and ensuring an even layer.
- Removing Air Bubbles: This tool is also useful for popping any air bubbles that appear, which helps prevent holes in your icing as it dries.
Advanced Decorating Techniques
Once you are comfortable with the basics, you can explore more advanced techniques to add flair and intricacy to your designs:
Layering and Texturing
- Layering Icing: Apply multiple layers of icing to create depth and texture. Allow each layer to dry before applying the next to achieve a distinct layered look.
- Texturing Techniques: Use different tips and icing consistencies to create textures. For example, a star tip can create a ruffled look, perfect for witch hats or pumpkin ridges.
Painting with Icing
- Edible Colors: Mix gel food coloring with a small amount of alcohol (like vodka) or lemon extract to create a “paint.” Use a fine brush to add details or shades to your iced cookies.
- Technique: This method is great for adding intricate details like facial features on character cookies or shadows for a more dramatic effect.
Using Stencils
- Stencils for Consistency: Apply stencils over dried icing and use spray-on food color or a thin layer of contrasting icing to add patterns and details. This is especially effective for consistently replicating complex designs.
5. Advanced Decorating Ideas Using a Halloween Cookie Decorating Kit
When you’re ready to elevate your cookie decorating skills, incorporating advanced techniques can add a level of sophistication and creativity to your Halloween treats. Using your halloween cookie decorating kit, you can experiment with stencils and 3D effects to produce visually striking cookies that stand out at any Halloween gathering.
Using Stencils
Stencils are a fantastic way to achieve intricate and consistent designs with ease. They are particularly useful for creating detailed patterns or adding a professional touch to your cookie decorating projects.
How to Use Stencils with Your Halloween Cookie Decorating Kit:
- Choose the Right Stencils: Select stencils that match your Halloween theme, such as spiders, ghosts, bats, or haunted houses. Ensure they are the right size for your cookies.
- Prepare Your Icing: For stenciling, the consistency of your icing is crucial. It should be thick enough to hold its shape but still flexible. Royal icing is ideal for this purpose.
- Secure the Stencil: Place the stencil directly on the cookie surface. You might want to lightly adhere it with a few dabs of icing to prevent it from moving.
- Apply the Icing or Dusting Powder:
- Icing Application: Use a small offset spatula or a palette knife to spread a thin layer of icing over the stencil. Gently scrape away excess icing for a clean finish.
- Dusting Powder: For a softer effect, you can use dusting powders like powdered sugar or edible glitter. Gently tap the powder over the stencil using a fine sieve for an even distribution.
- Remove the Stencil: Carefully lift the stencil away from the cookie, pulling up vertically to avoid smudging the design.
- Let It Dry: Allow the design to set completely before adding any further decorations or packaging the cookies.
Creating 3D Effects
Adding dimension to your cookies can transform them into miniature works of art. 3D effects not only enhance the visual appeal but also add a tactile element to your decorations.
Techniques for Creating 3D Effects:
- Layering Icing: Build up layers of icing to form elevated designs. Allow each layer to dry slightly before adding the next to maintain the structure and height.
- Adding Edible Decorations: Use items from your halloween cookie decorating kit like sprinkles, edible pearls, or shaped fondant pieces to add depth. These can be adhered to the wet icing or embedded into soft fondant.
- Examples of 3D Designs:
- Spider Webs: Pipe a flat base layer of a web design, then add another layer on top to create a raised effect. Finish with a small edible spider made from fondant or piped icing.
- Witches’ Hats: Start with a basic triangle shape for the hat and add a thick brim. Layer more icing around the base and top of the hat for depth, and use a contrasting color to highlight features.
6. Tips and Tricks for Perfect Halloween Cookies
Creating Halloween cookies with a halloween cookie decorating kit can be a delightful experience, but even the most seasoned bakers can encounter some challenges. Here are essential tips and tricks to help you navigate common pitfalls and ensure your decorated cookies turn out perfectly every time.
Maintaining Icing Consistency
The consistency of your icing is one of the most critical factors in successful cookie decorating. Whether you’re piping intricate details or flooding large areas, the right consistency will make all the difference.
How to Achieve and Maintain the Right Icing Consistency:
- For Piping: You’ll need a thicker consistency, similar to toothpaste, which will hold its shape and not spread when piped. If your icing is too runny, gradually add powdered sugar until you achieve the desired thickness.
- For Flooding: The icing should be thinner than that used for piping, but still thick enough to stay within the outlines. A good test is the “ribbon” test; icing should flow off the spoon and settle smoothly back into the bowl. If it’s too thick, thin it out by adding small amounts of water, a few drops at a time.
- Testing Consistency: Practice on parchment paper before applying to cookies. Adjust as necessary until you’re confident with the results.
Fixing Common Mistakes
Mistakes are a natural part of any creative process, and cookie decorating is no exception. Here’s how you can address them without starting over:
- Wiping Off Fresh Mistakes:
- Immediate Correction: If the icing is still wet and you make a mistake, use a clean, damp brush or cloth to gently wipe it off.
- Swift Action: The key is to act quickly before the icing begins to set, so keep materials handy for corrections as you work.
- Covering Mistakes with Decorations:
- Camouflage Techniques: If the icing has already set and a mistake is visible, think creatively about how to incorporate a new element into the design. For instance, if there’s a smudge, you might add a decorative element like a bat or a pumpkin over it.
- Layering: Applying a new layer of icing can also mask errors. Use a contrasting color to turn the mistake into a design feature, such as transforming a smudged area into part of a shadow or background.
Additional Tips for Perfect Halloween Cookies
- Chill Your Cookies Before Decorating: Chilling the cookies after cutting them out and before baking helps them retain their shape, providing a better canvas for decorating.
- Use the Right Tools: Invest in quality tools from your halloween cookie decorating kit, such as precision tips for your icing bags and flexible spatulas for smoothing. Good tools can significantly ease the decorating process.
- Plan Your Designs in Advance: Sketch out your designs or have a clear idea in your mind before you start. This planning can help you avoid hasty decisions that might lead to mistakes.
- Allow Proper Drying Time: Be patient and allow your icing to dry completely, ideally overnight, before adding additional layers or details. This prevents colors from bleeding into each other.
7. Inspiration for Halloween Cookie Designs
Unleashing your creativity with a halloween cookie decorating kit can make your Halloween celebrations uniquely memorable. Here are some inventive ideas to spark your imagination, covering both classic Halloween themes and more modern interpretations. These ideas will surely impress anyone who gets a taste of your spooky treats.
Classic Halloween Themes
Embrace the spirit of Halloween with these timeless motifs that continue to captivate and thrill. Here’s how you can bring these classic themes to life:
- Ghosts and Ghouls:
- Design Tips: Use simple ghost shapes, and add personality with different facial expressions. Play with features like wide eyes or spooky smiles using black icing.
- Technique: Piping and flooding with white icing create the ghost’s body, while smaller details can be added with precision tips.
- Pumpkins:
- Base and Details: Start with orange icing for the round pumpkin body. Use green icing for the stalk and vines.
- Carved Faces: Add different ‘jack-o’-lantern’ faces by carving designs into the icing with a toothpick or small knife before it sets, creating a lit-from-within effect.
- Witches:
- Silhouettes: Employ black icing to pipe the outline of a witch flying on a broom. Fill in the silhouette with thin, even flooding.
- Background: Enhance the scene with a full moon in the background using pale yellow or silver icing.
- Bats and Black Cats:
- Shapes and Features: Use cutters or freehand shapes of bats and cats. Add features like wings and eyes with contrasting icing.
- Effect: For a glossy look, consider a thin layer of edible glitter or a glaze over the black icing.
Modern Takes on Halloween Treats
For those looking to break tradition and add a modern twist to their cookie designs, these unique ideas can set your cookies apart:
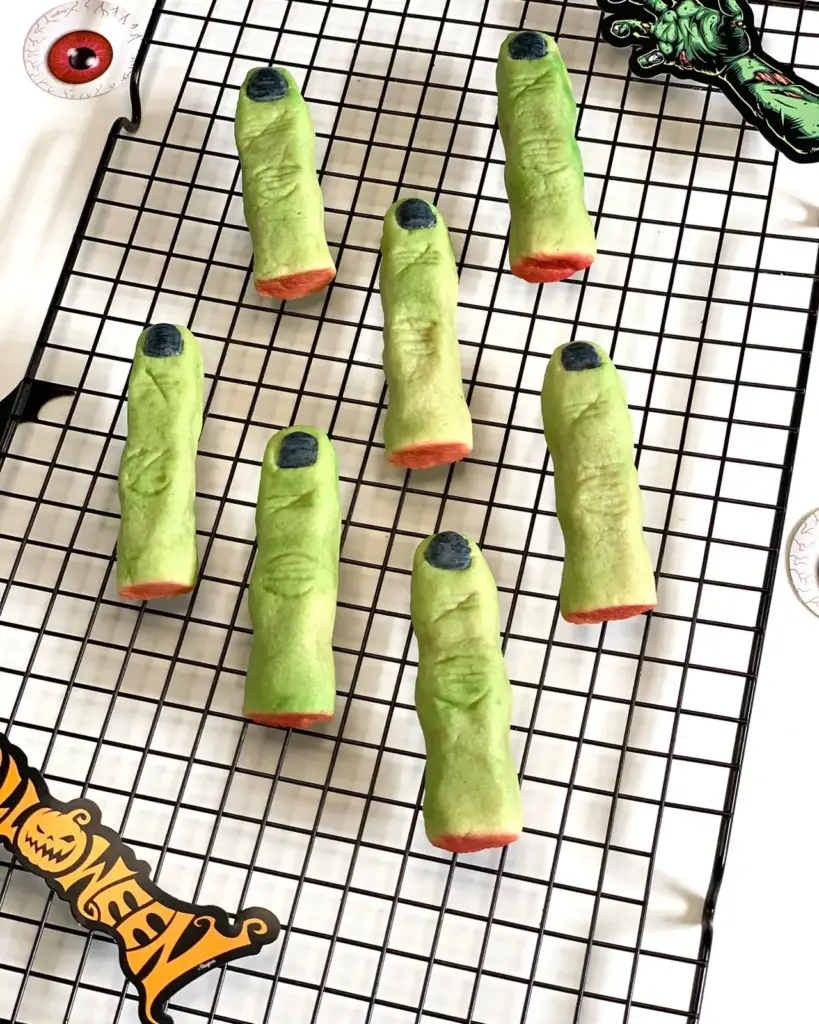
- Zombie Hands:
- Design: Utilize a hand-shaped cutter. Use green icing as the base for the flesh, then red icing to add gruesome details like blood and bones.
- Technique: Layer slightly thicker icing to create raised details that mimic bones sticking out, enhancing the 3D effect.
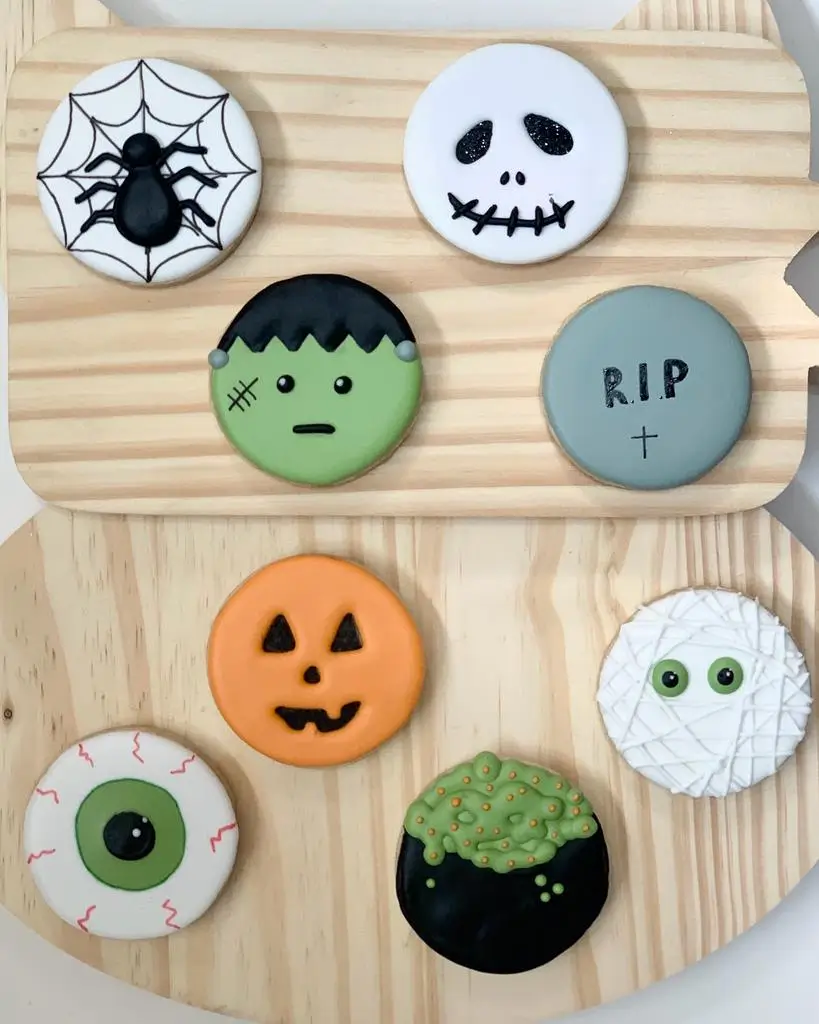
- Spooky Eyes:
- Base: Start with a simple round cookie.
- Details: Use different colors for the iris, and add a black dot for the pupil. Create dilated pupils with thin black circles around the colored iris.
- Highlight: A tiny white dot on the pupil can mimic the reflection of light, making the eyes appear more lifelike.
- Monster Faces:
- Variety: Let your imagination guide you. Use various colors for the base, and create faces with diverse expressions using icing and small candies.
- Features: Experiment with textured icing to create furry or scaly monsters, and use vibrant colors for a playful impact.
8. Preserving and Storing Decorated Cookies
After dedicating time and effort to creating beautifully decorated Halloween cookies with your halloween cookie decorating kit, it’s crucial to store them properly. Proper storage ensures that your cookies retain their aesthetic appeal and taste fresh. Here’s a detailed guide on the best practices for storing your decorated cookies to maximize their shelf life and quality.
Best Practices for Storage
Proper storage starts immediately after decorating. Follow these best practices to ensure your cookies remain in perfect condition:
- Let the Icing Harden:
- Time Requirement: Allow the icing to set completely, which can take several hours or even overnight, depending on the thickness and type of icing used.
- Atmosphere: Ensure the cookies are left in a cool, dry place away from direct sunlight while the icing hardens to prevent melting or color fading.
- Use Airtight Containers:
- Layering: Once the icing has hardened, layer the cookies between sheets of parchment paper to prevent them from sticking to each other.
- Container Choice: Choose high-quality airtight containers that seal well to keep out moisture and other contaminants.
- Spacing: Avoid overcrowding the cookies in the container, which can lead to damaged decorations.
- Keep at Room Temperature:
- Duration: Most decorated cookies will stay fresh for about a week when stored at room temperature.
- Environment Considerations: Avoid places near heat sources or in direct sunlight, which can cause the icing to soften and colors to fade.
- Refrigeration Warnings: Do not refrigerate decorated cookies as the moisture can cause the icing to become sticky and colors to bleed.
How to Keep Cookies Fresh for Longer
For those who need to store cookies longer or live in climates less conducive to room temperature storage, consider these tips:
- Freezing:
- Preparation: Place the fully dried, decorated cookies in a single layer on a baking sheet to freeze initially. This prevents them from sticking together once they are in a container.
- Storage: Transfer the frozen cookies to an airtight container, separating layers with parchment paper.
- Thawing: When ready to serve, thaw the cookies at room temperature, keeping them in their container until they have completely defrosted to avoid condensation affecting the decorations.
- Avoid Humidity:
- Storage Environment: Keep the cookies in a cool, dry place. Humidity can soften the cookies and degrade the quality of the icing.
- Dehumidifiers: In naturally humid environments, consider using a dehumidifier in the storage area or including silica gel packets in the cookie containers to absorb excess moisture.
9. Conclusion
Decorating Halloween cookies is a delightful way to express your creativity while making something delicious. Whether you’re a beginner or a seasoned pro, each cookie offers a canvas for your culinary art. Don’t be afraid to experiment with designs, techniques, and flavors. Most importantly, have fun and share the joy (and the treats) with others!
Remember, the beauty of cookie decorating is that each piece is a unique work of art, reflecting the spirit of the season and the personality of its creator. So grab your Halloween cookie decorating kit, and let the magic begin!
10. FAQs
- What is the best icing to use for cookie decorating?
Royal icing is preferred for its smooth texture and hardening capability, making it ideal for intricate designs. - How long do decorated cookies last?
Properly stored, decorated cookies can last up to a week at room temperature or up to 3 months in the freezer. - Can I make vegan Halloween cookies?
Absolutely! Use vegan-friendly ingredients for the cookie dough and icing, such as plant-based butters and milk substitutes. - Are there gluten-free options for cookie kits?
Yes, there are many gluten-free mixes and ready-made decorating kits available that cater to gluten-sensitive individuals. - Tips for decorating with kids?
Keep it simple and fun! Use safe, easy-to-handle tools and let the kids be creative with colors and designs. Edible markers are a great, mess-free option for little decorators.


